


MUA Kerry Harvey gives a step-by-step guide to a smokey eye for a fabulous festival look.
 With festival season on the way, let’s amp things up with a step-by-step smokey makeup tutorial. I created this specific gorgeous smokey eye for a shoot I did lately and wanted to share this fabulous combination of pewter, plum and coffee brown hues with you!
To begin with, I prepped and primed the skin and added foundation (you can do this after if you wish)
I find foundation is the perfect base for any detailed eye makeup as it not only conceals any discoloration from thread veins, darkness etc, but it also cuts costs on having to buy a devoted eye primer!
Just take note, when you base the eye with a foundation, be sure to powder over with a transparent powder for a velvety smooth base for fabulous blending thereafter!
1) Taking a flat paddle brush add a soft natural matte or even a very fine pearlescent natural tone all over the lid area.
2) Using a fluffy blending brush, pick up a little product (a slightly darker matte natural/taupe tone) and work that into the socket area. This is what’s called your ‘transition colour’ and helps integrate your lighter and darker shades to look flawlessly blended later.
3) Using a much finer brush known as a pencil brush, (it has a finer pointed end for more detailed work), pick up a touch of the plum colour and begin to work that lightly into the outer crease area in a ‘C’ shape. I suggest adding a little at a time as adding too much to begin will give a bruised, dirty eye makeup effect.
4) Taking a touch of highlighter on a larger paddle brush, simply add some highlight to the inner corner of the eyes, and also under the brow bone for a brow lifting and overall eye-opening effect!
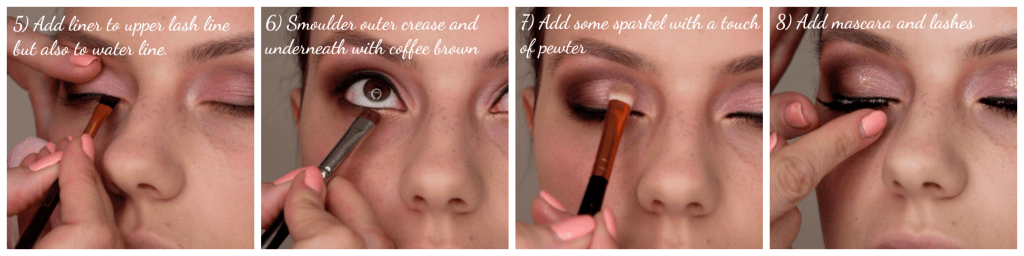
5) Add liner – I like to add a gel liner and pop a little flick at the end for an eye opening/lifting effect. Using a kohl coffee pencil, also rim the waterline of the eye, upper and lower for a truly vamped up smokey look!
6) Taking a flat liner brush, and a touch of a coffee coloured shadow, let’s no add a richness and smoulder the overall look up! Blend this colour into the lower lashes – you can go the entire way over if you like a very smoked up eye makeup. I’ve taken the shade halfway from the outer corner and integrated a pewter shade to blend into the inner eye keeping that eye-opening effect in mind.
7) Going back in with my flat paddle brush, I’ve taken a touch of pewter (it’s a gold/silver type colour) and placed it right on the centre of the lid making the eye look ‘POP’Finish off the eyes with your favourite mascara and add lashes for a
8) Finish off the eyes with your favourite mascara and add lashes for a voluminous effect and that’s your easy step-by-step plum/pewter smokey eye look in a nutshell!

For more on this look, the products I used, plus a short video demo, check out my Facebook Beauty Group page by clicking here!
Fancy seeing and learning this for real, then check out my new class dates in Donegal Town!
I’ve created intimate group classes covering various topics such as ‘The Basics – Natural Makeup Masterclass’ to ‘Smokey Eye & Contouring’ classes for the more advanced makeup addict so feel free to book your place, learn some new makeup tricks and even bring a friend for added fun!
For daily updates on shoots in action, new blog posts etc, be sure to follow me on Snapchat (@kharveydesigns or scan the code below) or feel free to drop me a line if you have any questions or a specific beauty topic you’d like covered! I’d love to hear from you! K x

The Author
You Might Also Like

